|
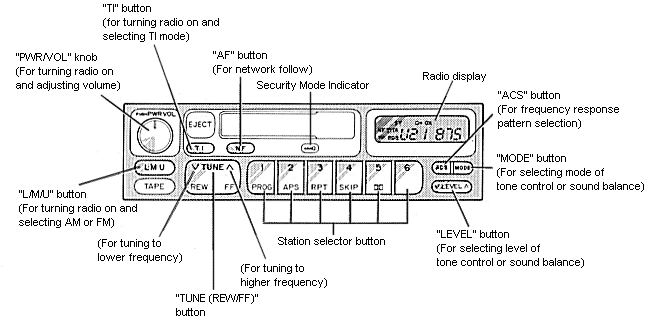 
(a) Listening to the radio
- Push the "L/M/U" button to turn the radio on and select either an AM or FM broadcast, or push the "TI" button to receive a TI (Traffic Information) station. (See Recieving traffic information from the RDS (Radio Data System)".)
"L","M", "U1" or "U2" will appear on the display.
The radio can also be turned on by pushing the "PWR/VOL" knob if the radio was on when the system was turned off.
- Turn the "PWR/VOL" knob to adjust the volume.
- Tune in the desired station. (See Selecting a station and Presetting a station.)
The radio will charge automatically to stereo reception when an FM stereo broadcast is being recieved. At the same time, "ST" will appear on the display. When the receiving signal gets weak, the channel separation will automatically be reduced for the lowest noise. If the signal becomes extremely weak, the radio will switch over to monaural reception.
- Adjust the tone and sound balance (See Adjusting the tone and Adjusting the sound balance.)
- To turn the radio off, push the "PWR/VOL" knob.
(b) Selecting a station
Tune in the desired station using one of the following methods. The frequency will appear on the display.
- Preset tuning:
-
Use for tuning-in to a desired present station. (See Presetting a station.)
- Push the "L/M/U" button repeatedly until the desired selection appears on the display.
- Push the station selector button which has been preset to the desired station. The radio will tune ion to the station and the button number will appear on the display.
- Seek tuning:
- Use for automatic station search and stop.
Push the "TUNE SEEK (REW/FF)" button on either side and hode it until a beep is heard. The radio will begin seeking up or down for a station of the nearest frequency and will stop on reception. Each time you push the button, stations will be seeked out one after another.
If the radio cannot seek out any stations in one pass because of too weak signals, the radio will begin seeking again with sensitivity boosted for searching out weak stations. At this time, "DX" will appear on the display.
- Manual tuning:
- Push the "TUNE SEEK (REW/FF)" button on either side within 0.5 second. Each time you push the button, the radio will step up or down to another frequency where stations could exist.
(c) Presetting a station
- Push the "L/M/U" button repeatedly until the desired selection, "L", "M", "U1" or "U2" appears on the display.
You can preset any desired six stations in each selection. When you preset a station, check which selection you have used.
- Tune in the desired station. (See Selecting a station.)
- Push one of the station selector buttons and hold it until a beep is heard. This sets the station to the button and the nutton number will appear on the display.
To change the preset station to a different one, follow the same procedure.
The preset station will be cancelled when the power source is severed (battery disconnected, burnt fuse, etc.)
(d) Receiving traffice information from the RDS (Radio Data System)
- The radio will automatically switch to the RDS mode to receive an RDS station while tuned to FM broadcasts. At this time, "RDS" and the name of the RDS station will appear on the display.
When you tune in a new FM station with RDS mode, the new frquency will appear on the display for 5 seconds before the name appears.
- Tune in the desired station that broadcasts traffic information by using one of the following methods. When the radio receives a station which broadcasts traffic information, "TP" (Traffic Program) will also appear on the display. You can then listen to regular programs and to traffic information between the regular programs.
- Preset turning, seek tuning and manual tuning:
- Use for tuning-in to a desired station. (See Selecting a station.)
- TI (Traffic Information) tuning:
- Use for receiving TI stations all over the band.
- The radio is switched to the TI mode by pushing the "TI" button. At this time, "TI" will appear on the display.
If the radio does not receive a TI station for 20 seconds after the "TI" button is psuhed, the radio will begin seeking a TI station by using the AF (Alternative Frequencies) list from the TI station and will stop on receiving a TI station. A beep will sound and "SEARCH" will appear on the display to tell you when this feature starts operation.
If the radio cannot find any station in one pass because the signals are too weak, the radio will begin seeking again with sensitivity boosted to search out weak stations. At this time, "DX" will appear on the display. If the signal gets extremely weak, the radio wil stop seeking a station and "NOTHING" will appear on the display for 2 seconds. After this, if the radio cannot receive a TI station for 20 seconds, the radio will begin seeking again.
When "TI" appears on the display, the radio will receive a TI station only if seek tuning is used.
- If the selected station is broadcasting another program when traffic information is desired, push the "TI" button until "TA" (Traffic Announcement) appears. When "TA" appears on the display, the radio mutes all programs but the traffic program, or, if a cassette is inserted in the slot, the cassette will be played until traffic information begins.When the traffic information ends or the signal gets weak, the initial programming is resumed.
- To return to normal mode from the TI mode, push the "TI" button until "TI" and "TA" disappear from the display.
- RDS auto tuning:
- Use for seeking RDS stations all over the band.
- Push the "NF" (Network Follow) button for less than 2 seconds to receive the same program while tuning in an RDS station. At this time, "NF" will appear on the display, When reception conditions worsen, a network which broadcasts the same program will be selected using the AF list from the RDS station.
To change the NF mode, push the "NF" button for at least 2 seconds. When "REG ON" appears on the display, the radio will select the RDS station which has the same PI (Program Identification) code. When "REG OFF" appears on the display, the radio will select the RDS station which has the same three-digit number PII code.
- If the radio cannot find an RDS station for 40 seconds, the radio will mute all programs and begin seeking an RDS station of the same PI code by using the AF list. If the radio cannot seek out any station in one pass because the signals are too weak, the radio will begin seeking all the FM broadcasts again. A beep will sound and "SEARCH" will appear on the display to tell you when this feature starts operation.
If the dignal gets extremely weak, the radio will stop seeking a station and "NOTHING" will appear on the display for 2 seconds.
- If a cassette is inserted in the slot with "NF" appearing on the display, the cassette can be played until an "FM" stationis receieved.
- To cancel the NF mode, push the "NF" button twice. "NF" will then disappear from the display.
(e) Adjusting the tone
- Automatic tone adjustment
-
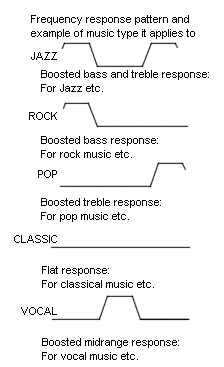
Push the "ACS" button repeatedly until the desired frequency response pattern appears on the display. This function automatically controls the tone in accordance with the selected pattern. To cancel it, push the button until "DEFEAT" appears on the display. This allows you to adjust the tone manually.
- Manual tone adjustment
-
Before using the tone controls, push the "ACS" button repeatedly until "DEFEAT" appears on the display.
To adjust a low-pitch tone, push the "MODE" button repeatedly until "BASS 0" appears on the display, then push the level button (to either the left or right side) to suit your preference. The low-pitch tone level canbe changed from "BASS -10" to "BASS +10" and the level will appear on the display.
To adjust a high-pitch tone, push the "MODE" button repeatedly until "TREB 0" appears on the display, then push the level buton (to either the left or right side) to suit your preference. The high-pitch tone level can be changed from "TREB -10" to "TREB +10" and the level will appear on the display.
|  |
(f) Adjusting the sound balance
To balance the sound between the right and left speakers, push the "MODE" button repeatedly until "BAL 0" appears on the display, then push the level button (to either the left or the right side) to suit your preference. The sound balance of the left and right speakers can be changed from "BAL L10" to "BAL R10" and the sound balance will appear on the display.
To balance the sound between the front and rear speakers, push the "MODE" button repeatedly until "FAD 0" appears on the display, then push the level button (to either the left or right side) to suit your preference. The sound balance of the front and rear speakers can be changed from "FADE F10" to "FADE R10" and the sound balance will appear on the display.
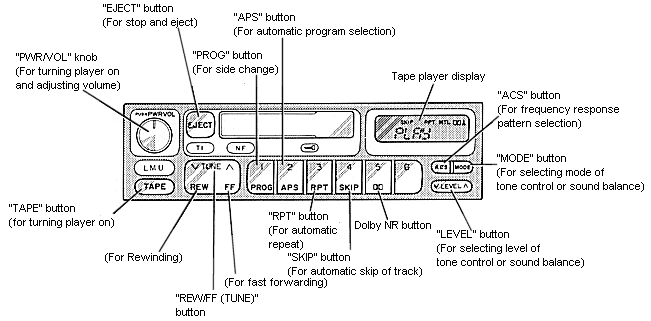
(g) Listening to the cassette tape
- Put the cassette into the slot, with the tape side to the right and lightly push it in. The tape player will grab the cassette and slide it into place to play it. If the radio is on when inserting the cassette, the radio will automatically turn off.
If the cassette is already in the slot, push the "TAPE" button.
At this time, "PLAY" will appear on the display.
The tape player can also be turned on by pushing the "PWR/VOL" knob if the tape player was playing when the system was turned off by pushing the knob.
When a metal or chrome equivalent tape is inserted, the player will automatically adapt to it and "MTL" will appear on the display.
- If using a tape recorded with Dolby NR*, push the DOBLY NR button. The Dolby noise reduction system will operate. To play a tape recorded without Dobly NR*, push the button once again.
Dolby noise reduction manufactured under license from Dolby Laboratories Licensing Corporation "DOLBY" and the double D symbol are trademarks of Dolby Laboratories Licensing Corporation.
- Turn the "PWR/VOL" knob to adjust the volume.
- Select your program. (See Selecting a program.)
- Adjust the tone and sound balance. (See Adjusting the tone and Adjusting the sound balance.)
- If desired, other functions may be used for your convenience. (See Other tape player functions.)
- To turn the player off, push the "PWR/VOL" knob.
- To eject the cassette, push the "EJECT" button, As this is done, the player will turn off. If the radio was on when the cassette tape was inserted, it will automatically turn on again.
The key can be at any position to eject the cassette.
(h) Selecting a program
- Push the "PROG" button to select a side to play. The tape operation indicator display shows you which side is being played.
The player will automatically reverse directions at the endo fthe tape to play the other side.
- Push the "REW/FF (TUNE SEEK)" button on either side to fast forward or rewind the tape. At this time "FF" or "REW" will apear on the display. To stop either fast forwarding or rewinding, push the "TAPE" button. The tape will resume playing.
- Manual program selection
- Push the "REW/FF (TUNE)" button on either side to fast forward or rewind the tape. At this time, "FF" or "REW" will appear on the display. To stop either fast forwarding or rewinding, push the "TAP" button. The tape will resume playing.
- Automatic program selection:
- Use for quick access to a desired program.
- Push the "APS" button. "APS" and program number "1" will appear on the display.
- Repeat the push until the number indicates how many programs ahead of/behind the one currently being played you wish to listen to (include the program you are currently listening to when counting back previous programs).
The maximum number of settings is nine.
The tenth push on the button will cancel the function and "APS" will go off.
- Push the "REW/FF (TUNE)" button to get the tape going in the direction of the program. At this time "FF" or "REW" will also appear on the display. The player will automatically stop at the beginning of the selected program and play it.
If the number you set excees the number of the programs remaining on the side currently being played, the tape will fast forward to the beginning of the other side (when fast forwarding) or rewind to the beginning of that side (when rewinding).
This function does not work properly unless the blank portions on the tape have 3 seconds or more between one program and another.
(i) Other tape player functions.
- "RPT" button:
- Use for automatic repeat of the program currently being listened to.
Push the "RPT" button while the program is being played. As this is done, "RPT" will appear on the display. When the program is finished, the tape will automatically be rewound to the beginning oft he program and the program will be played again. To cancel it, press the button once again.
This function does not work properly unless the blank portions on the tape have 3 seconds or more between one program and another.
- "SKIP" button:
- Use for automatic skip of blank portions between programs.
Push the "SKIP" button. "SKIP" appears in the display. The player will automatically skip any blank portions of 15 seconds or more, and play the next program, even if it is on the other side. To cancel it, push the button once again.
(j) Anti-theft system.
To deter theft of your radio unit, the system is designed so that the radio unit becomes inoperable if the unit is stolen from the vehicle.
Setting the anti-theft system
The system is not preset at the factory. You must input a three-digit identification number decided by you.
|
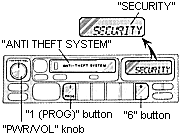 |
- Make sure the radio unit is turned off with the ignition switch in "ACC".
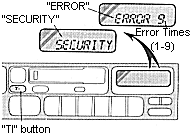
- While holding the "1 (PROG)" and "6" buttons in, push and hold the PWR/VOL" knob in until "SECURITY" appears on the display.
|
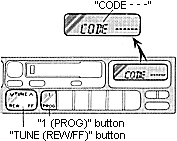 |
- Press the "1" (PROG)" button while holding the "TUNE (REW/FF)" button in. "CODE ---" will appear on the display.
|
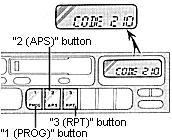 |
- Input your identification number by pressing the "1 (PROG)", "2 (APS)", "3 (RPT)" buttons repeatedly. Use the "1 (PROG)" button for the first digit, the "2 (APS)" button for the second digit and "3 (RPT)" button for the last digit. For example, if your number is 210, press the "1 (PROG)" button threee times, the "2 (APS)" button twice and the "3 (RPT)" button once. If the display returns to "CODE ---" while inputting, try again.
We recommend taht your identification number be associated with something easy to remember. In case you are unsure of the number, write it in a notebook you normally carry. Do not leave it behind in your vehicle.
|
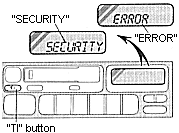 |
- With your identification number appearing on the display, press the "TI" button and hold it in until "SECURITY" appears on the display. "SECURITY" will go off to indicate the system is set. If invalid buttons have been used, "ERROR" will appear on the display before "SECURITY" appears. Try again from step 3.
|
 |
With your identification number
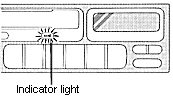
One the system is set, the idicator light turns on and off with the ignition switch in "OFF" and "SECURITY" will appear each time the key is turned to the "ACC" position. To change the identification number for some reason, cancel the system (See Cancelling the anti-theft system.) and set it again with a new number.
The system will be activated if the electrical power source is disconnected from the radio unit. When the system is activated, the audio system cannot be turned on even after the power supply resumes and "SECURITY" will appear on the display. If this happens, such as when the battery is discharged, see If the anti-theft system is activated.
|
Cancelling the anti-theft system |
 |
- Follow the steps 1 to 4 described in Setting the anti-theft system.
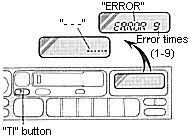
- With you identification number appearing on the display, press the "TI" button and hold it in until "- - -" appears on the display. "- - -" will go off to indicate the system is cancelled. If invalid buttons have been used, "ERROR" will appear on the display and "SECURITY" appears. Try again from step 3 in Setting the anti-theft system.
The figure with "ERROR" indicates how many errors you have made. You may make up to nine errors, but no more!
|
 |
NOTICE:
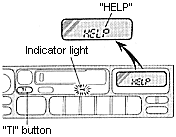
A tenth error will activate the anti-theft system and "HELP" will appear on the display. The audio system will be completely inoperable. At this time, the indicator light also comes on. If this occurs, contact your Toyota dealer.
At the time or resale of your vehicle, cancel the system for the new owner. |
If the anti-theft system is activated |
 |
The audio system make inoperable by the activated anti-theft system will be operable if you give it the correct identification number.
- Follow the steps 3 and 4 described in Setting the anti-theft system.
- With your identification number appearing on the display, press the "TI" button and hold it in until "SECURITY" appears on the display. "SECURITY" will go off to indicate that the system is reset, and the audio system is operable. If invalid buttons have been used, "ERROR" will appear on the display before "SECURITY" appears. Try again from the beginning.
|
|
See Cancelling the anti-theft system for notes on the figure with "ERROR". |
|